Friday, May 8, 2009

Lots of new stuff


Here's my latest shop addition:


Photobucket


This is a bench which is based on John White's Newfangled bench design originally published in Fine Woodworking.


another pretty important albeit simple project was to finally free up some badly needed floor space. I hung the drywall from the rafters:


there was some concern about weight issues, but that's about all I'm going to put up there, and I hope to be using some of the drywall in the house soon, replacing the kitchen walls, which will eat up a LOT of that stash in a hurry. At which point that rack will turn into sheetgoods storage.
More to come 'soon' now that the warm weather is here, I'm trying to spend more time out in the shop.

Saturday, November 1, 2008

New Jig in progress


With my interest in turning growing, I needed a way to keep my turning tools sharp. I was given a grinder last spring, but I need to learn how to sharpen. One popular way to speed up that learning curve is to use a jig, and the most popular one is the Wolverine. Unfortunately I don't have the $90 plus shipping to buy a wolvie. Luckily there are plans available online to make your own.


I still have to bolt down the grinder and make another smaller jig which holds the turning tool for the grind.

Lots of progress

I've continued the small shop shuffle, and here is how things 'stand' for the moment


I moved the storage cabinet to its semi-permanent home next to the main doors. The 'man door' will be just there to the right of the cabine where the bandsaw is at the moment. I'm thinking that will be a 'springtime' project.


Looking up into the loft, where Adam was a big help getting the gear up the ladder. I handed him the items as he stood on the ladder.


A whole lot of clutter, but I'll get it sorted out eventually.


Looking from the doorway down the left side of the shop. As you can see I have to clear up my benchtop a bit. I moved the power strip to the middle of the wall, eliminating one extension cord up to the 4' shop light


yeah, that light!


Saturday, September 6, 2008

Moving in almost complete


Well, at least the storage unit has a lot more elbow room in it, and the shop a lot less. I brought up the remainder of the wood from the unit, as well as several boxes of cut-offs and assorted old projects which I never got a chance to finish in the Madison Woodsmith shop.

I also did the small shop shuffle, moved everything away from the end wall there in the photo and popped open the insulation batt package. Emphasis on POP. I still have one whole batt left over plus a thin strip after I cut a couple of batts to fit under the window opening. I also had to slice three batts in half to get full coverage above the 8' long batts. Quick and easy to do, and minimal itchiness thanks to the paper backing.


One of the boxes fell apart on me (poor taping job when I packed in a hurry two plus years ago). Here is some of what I found in there. A few scrollsaw fretwork portraits and some chunks of Mahagony and Oak. I have three more entire boxes of short cutoffs. THankfully I now have a lathe, and I'll be able to use them for bowl blanks, and/or cutting boards etc...


Thursday, September 4, 2008

truck down!

Labor Day weekend is passed, where Did the summer go?


Lori was busy all weekend at the fire house, well, at the field days at the fire house to be more accurate. Bridgeport VFD has their annual field days every Labor day weekend, and she's the treasurer there, so has to handle all of the cash. Normally I spend the weekend there too, but this year, I decided that if they seemed like they could do without me, they would. Sure enough, I went to help out on Friday, and got a polite 'thank you' and got to make a few fried fish and french fries. Pretty soon however, the ladies auxiliary member whom I relieved came back and took over again. Well, I've set a move out date from the storage unit, and that date is fast approaching, so I decided that I would do my best to get a few truckloads out of there each weekend day. Good thing I did so on Saturday & Sunday, because monday Grizz convinced me that my driveline vibrations needed to be taken care of now, vs 'someday'.


The third U-joint on the shaft was shot, and Grizz took excellent care of the truck and me, getting it fixed for a lot less than a garage would have charged. Yet another big favor I owe you buddy, your day will come! The day ended with us needing to take the driveshaft to a shop to get the bearings torched to get them out. We tried hammering on them, but to no avail. Tuesday he was off, and got the job done while I was at work. Night and day thanks to this timely repair.

Sunday, August 31, 2008

Progress, lumber racks and more


I'm on a major kick to clear out my storage unit and move all of the gear up to the shop. Here was one trip's worth of lumber... I still have a bit more to come up, but it is mostly shorts and cut offs.


Speaking of shorts, I had to move the short stock I had on the lumber rack above the miter saw station, I think I need to install a couple of more brackets, that's a tad overloaded for my taste.


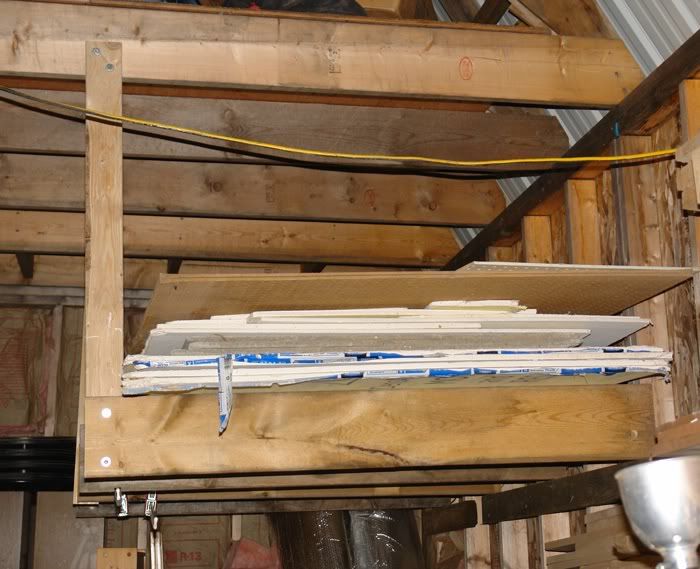
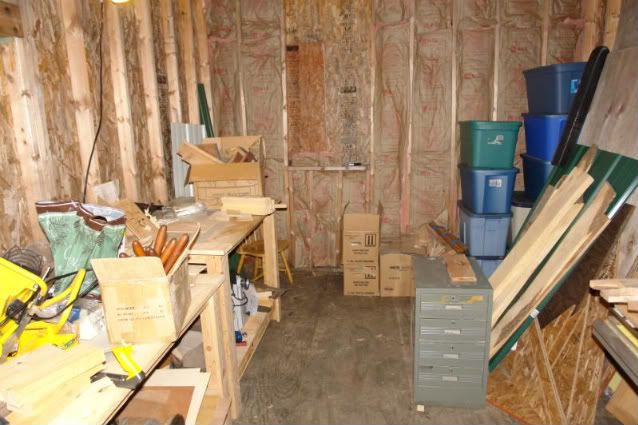
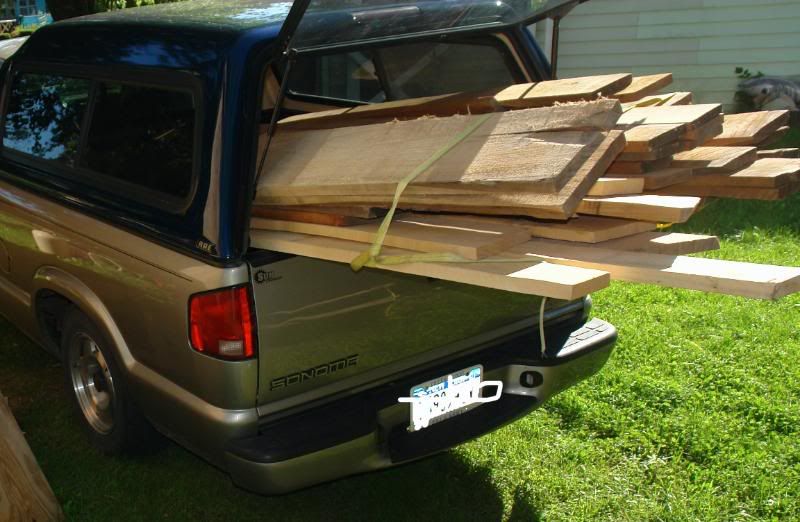
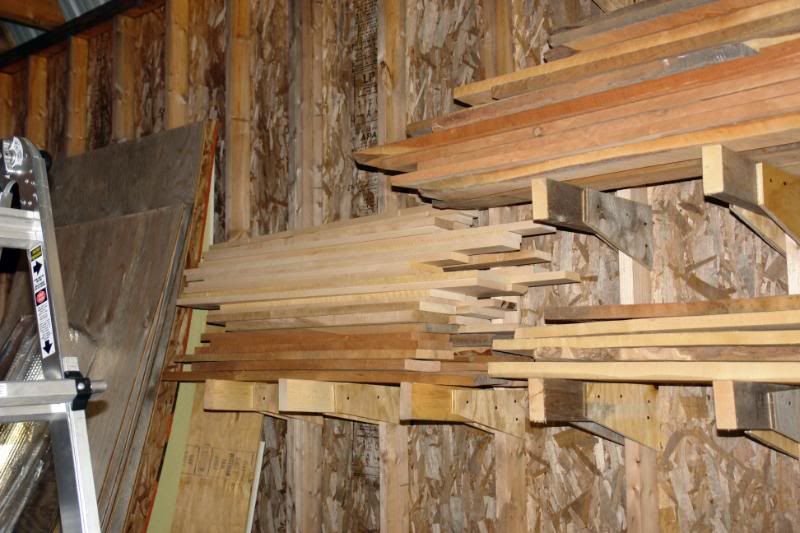
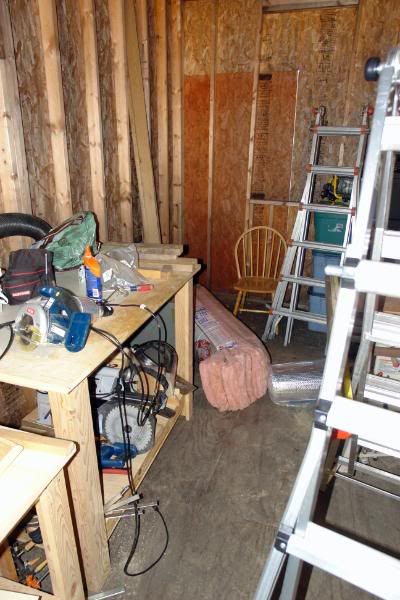
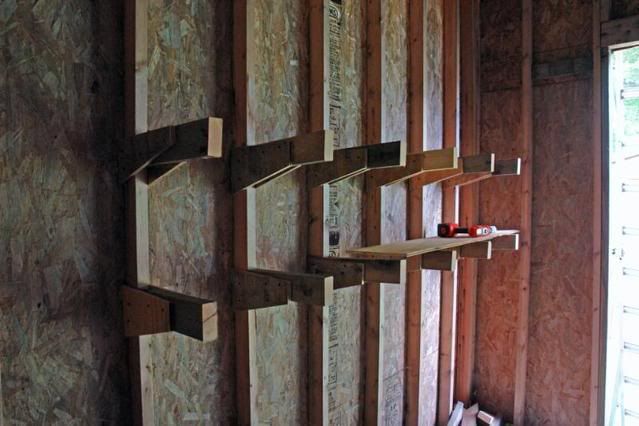
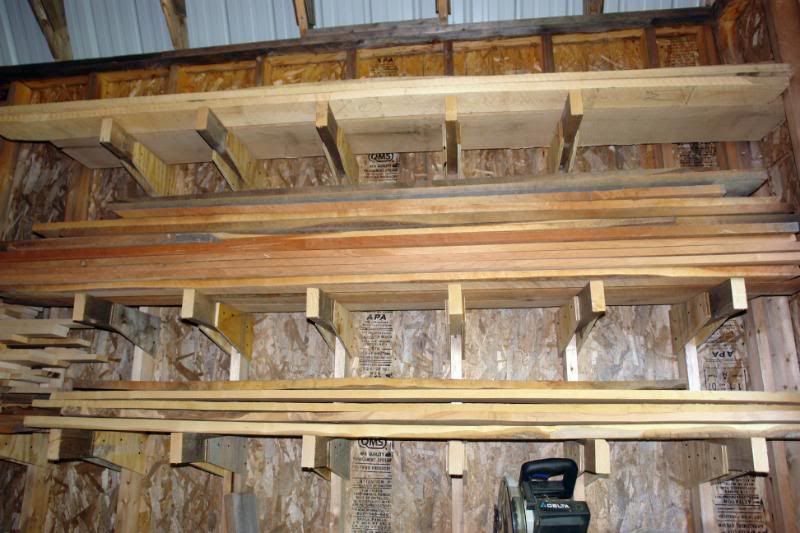
There's that truckload of wood up in the racks. The top level holds mostly butternut, the middle is all cherry and the lower level is maple. Most of it is still rough cut lumber, but there's a few pieces which have been dressed S4S (surfaced 4 sides for the non-woodworking reader)


This is the back end of the shop, note the sheet goods temporary storage area. along with the reflectix insulation which is going on all of the walls.


view of the far corner of the shop, showing the wall which will get insulation and plywood installed this weekend. Might even get ambitious and put in the window, since the storage unit is almost empty!

Tuesday, August 26, 2008

bench reassembly


I decided that my workbench, which is in two halves needed to be just a bit lower. I originally built them to just below elbow height, which for me is 42" high. That makes it convenient for not having to bend over and such, but it is a bit too high for good hand tool usage; planing and so forth.

Here you can see the torsion box and legs before the top stretchers get put on. The torsion box is 1/2" plywood with SYP for the 'meat' in the sandwich. Very sturdy, and makes for a nice solid workbench. The legs are hemlock glued and screwed into the classic 'L' style leg.

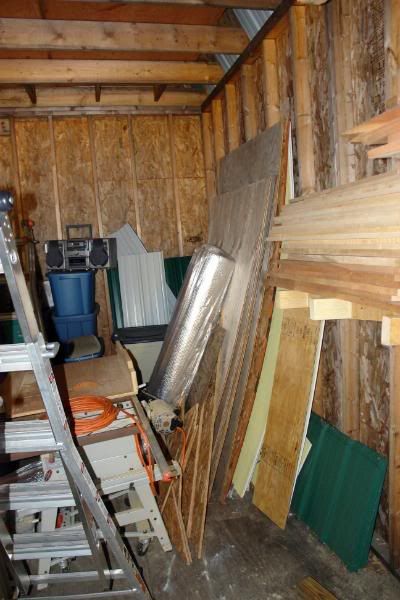
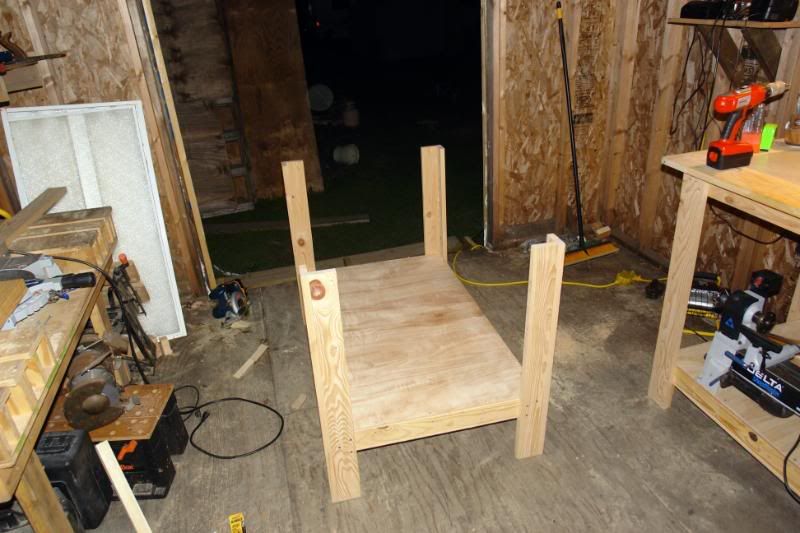
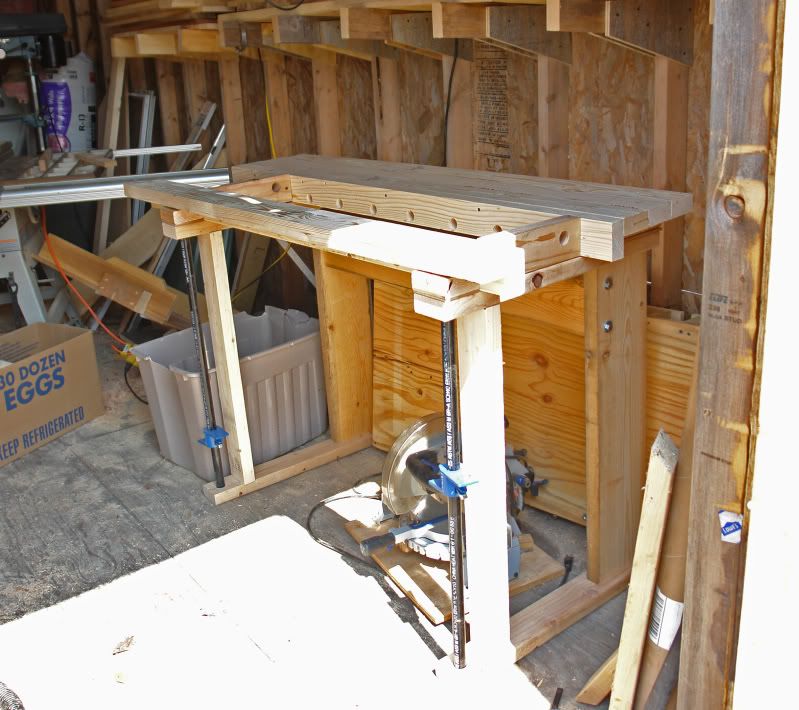
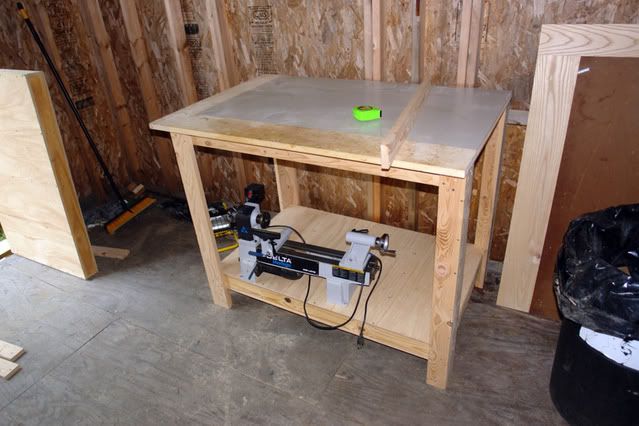
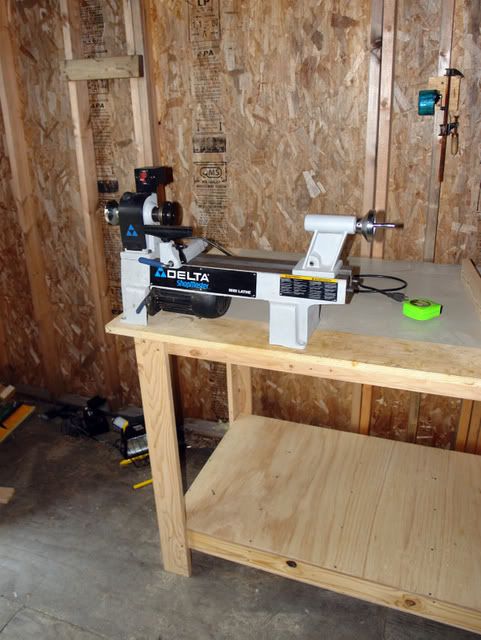
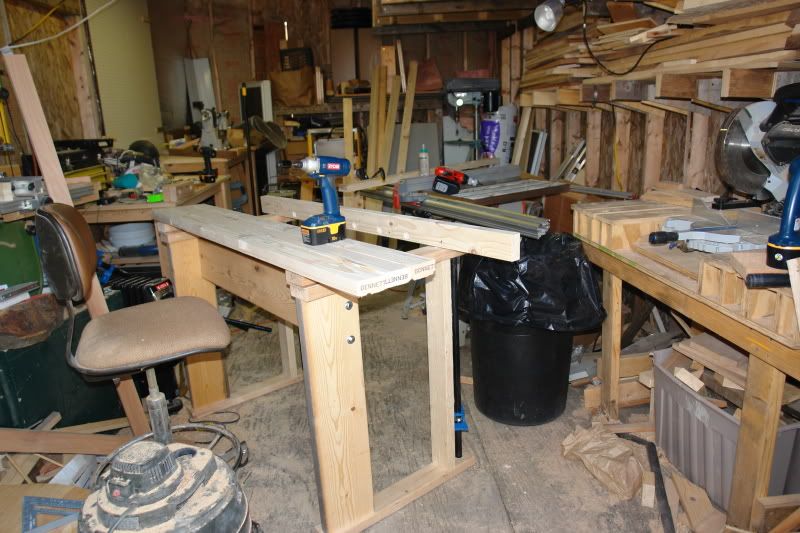
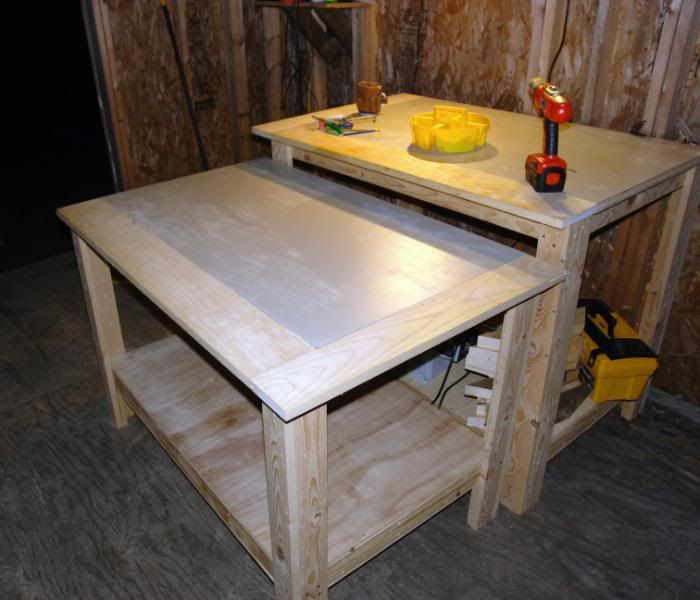
I made the lower bench just 35 3/4" tall which lets it serve in a pinch as outfeed support for my tablesaw.


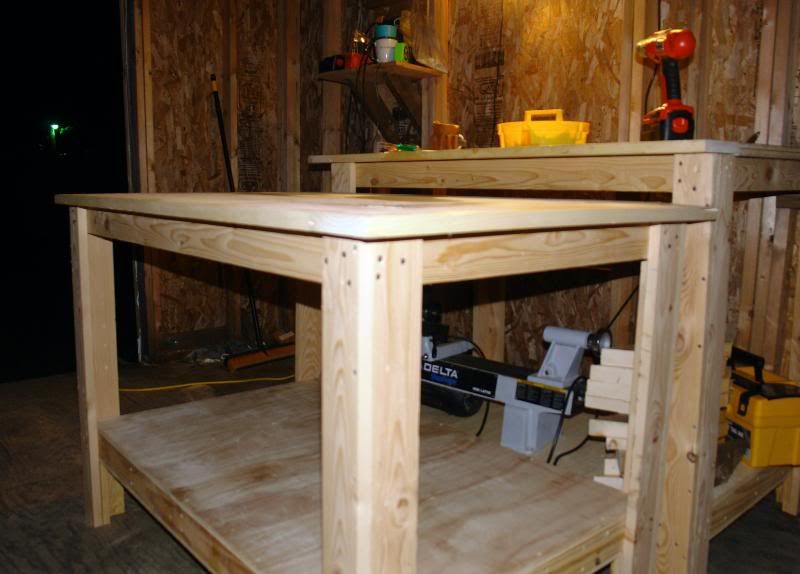
Here's a view showing the stretchers in place. that 6" difference in height makes a big difference. I think the taller bench is going to get a similar reduction in height. once I have a lot more of the moving done.

Monday, August 25, 2008

Man its dark in there!

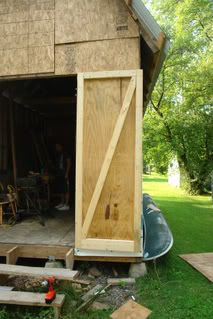
Howdy folks, got a little more progress on the shop this weekend. As regular readers well know it’s been a long project, and I’m far from done. This weekend was spent avoiding the last summer blast of heat, and hanging the doors on the shop…


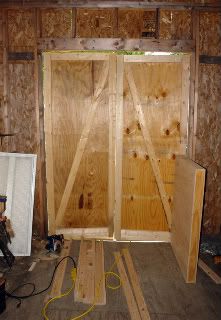
This may seem like a small step, but for me it marks when I can truly start moving in equipment and stuff into the shop. I made a couple of trips to the storage unit. The first trip was to get the drywall and cement board which I scored this spring. For a mere $20 I got 5 sheets of moisture resistant drywall, plus numerous cutoffs from a friend of Mark's who was clearing out his garage.


I forgot to get a photo, but I'll grab one tonight after work.

The second trip brought my lathe and benches.


Starting to get a little crowded in there, but that’s the nature of the beast… at only 240 sq ft I’ll be doing the ‘dance’ a lot as I get things ironed out.

Here's my first bench. And my midi lathe:


Here’s the first of my old workbench’s to be reassembled: I’m 6’1, and this bench is 41” high. I’m going to lower the other half after measuring my mini lathe on there:
As it sits now, if I were to use the other half of the bench the spindle would be at 57” high. I think I’m going to lower it about 7” just for good measure.
I’ve still got the other half of the bench, plus a benchtop drill press, a storage cabinet and a bandsaw to stuff in there as well. Not to mention, lumber, and so forth.

Saturday, August 16, 2008

One Door Hung.

I was out of town on Saturday, meeting up with my friends Tom & Cathie, whom I haven’t seen in about 10 years. On the way home from Buffalo, I stopped at the woodcraft store in Rochester, where I picked up some turning supplies. I got a micromesh sanding kit, as well as a few pen and pencil kits and some HUT brand wax for pen turning.

Sunday saw me back out in the shop in the morning, while the family was sleeping. I was busy building this:


It’s intended as a temporary rack, but it’ll likely wind up as semi permanent fixture of the shop. The location will certainly stay the same at least. I have to start putting some thought into what will go where in the shop. I’ve got a ton of stuff and not a lot of floor space to put it in. What I do have a relative ‘lot’ of is vertical space thanks to the 10’ sidewalls. Those racks are going to be right above the initial location of my CMS. I’ll add two more racks above those. When & if I fill those up with lumber.

Sheet goods will be another issue altogether, at least in the beginning. I’ve got at least 8 sheets of various materials to cope with. In the long run I’ll only be ‘storing’ cut-offs from whatever current project I’m working on.

Later on Sunday I started working on hanging the doors.

I trimmed back the OSB from the doorway, which was fun. I got to use the saws-all and the router. Bet you didn’t know that a PC 690 was really an overgrown laminate trimmer. Had to use it one handed from the ladder, but it got things cleaned up in short order.

James helped out, steadying the door while I installed the hinges. Everything was going ‘well’ until we opened the door…

And it hung up on the top step of the stairs, not quite opening halfway.


SO… after a few ‘bad words’ were uttered, we removed the top step to see just how much space we had…


and a close up view or two


My first impression was to cut the riser back and lower the top step, which would probably catch me every time I tried to walk into the shop. It’s only held on by a dozen or so deck screws, so I think what I’m going to do is hang the other door and then remove the stairs, dig out the bottom step area just a bit, level it off and then screw them back onto the building.


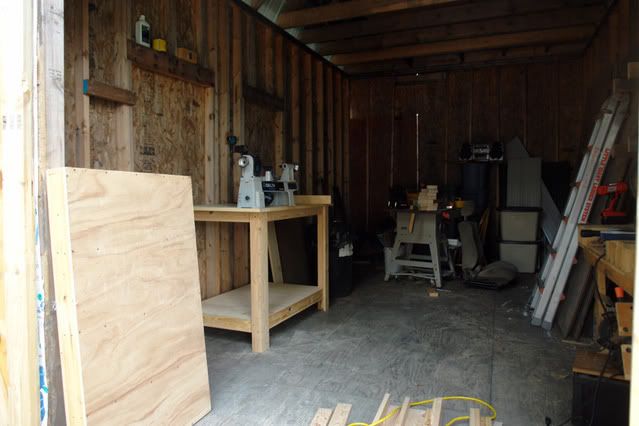
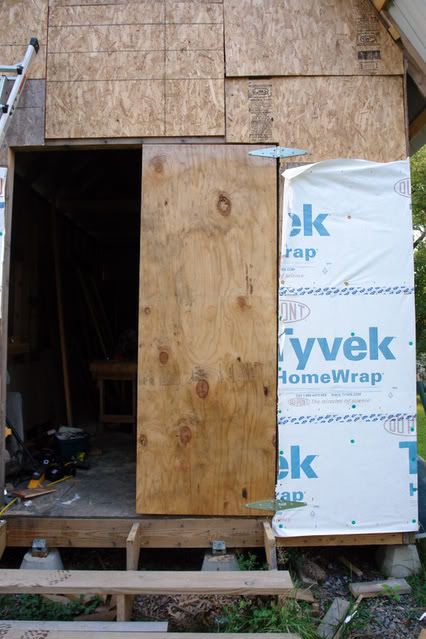
if you click on the inside view, you can see there is a bit of a gap around the door, but I'll put trim on it later, once all the tools are in and working.


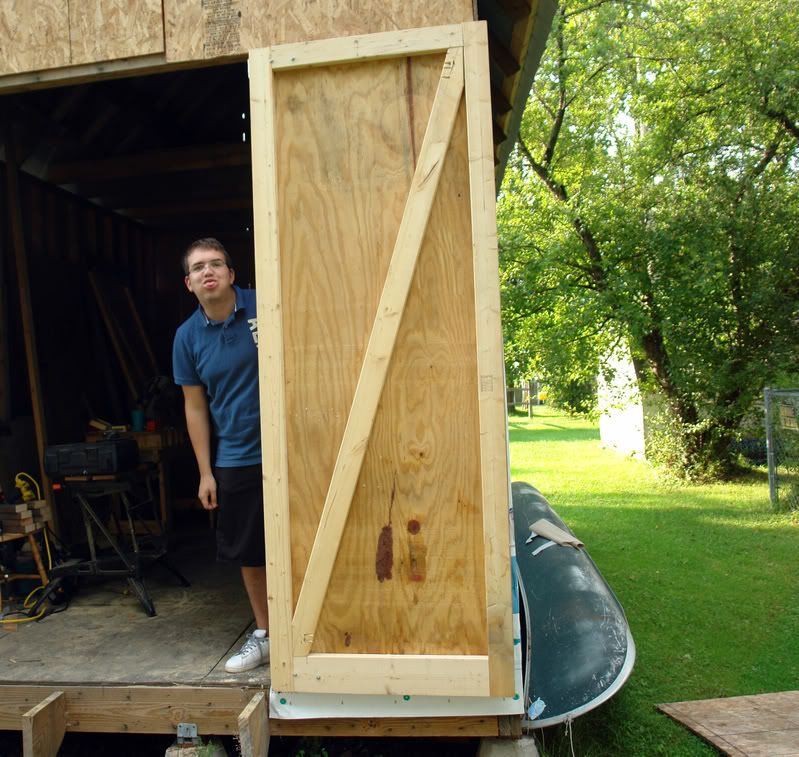
And it can be hard to find ‘good help’ Lucky for me, I did just that…


Thanks James!

Thursday, August 14, 2008

Upper section of walls installed


I was working on building a lumber rack for the shop yesterday, there are the cross pieces cut at a slight angle to counteract deflection from weight. I'm going to temporarily install them, just so I can get the wood from the pallets in the side yard stored, not to mention the cherry I have in my storage unit. I'm sure that eventually I'll build a much sturdier unit, but that's just part of the continual evolution of any shop.


Here's the wall which will hold the rack. About 10' of linear space. I'm planning on three levels initially, plus the floor.


At just about the time I was going to wrap up for the evening, one of the guys who helped me install my roof; Josh, stopped by. I had asked him for help putting the upper panels up on the end walls. I'd tried several times, but hadn't managed to get them installed. He spent maybe 15 minutes and got them up with only one adjustment to the pieces I had cut.


As you can see there are still gaps to deal with, but those should be a simple matter to cut and nail home. After that, I'll be putting the doors up after work tomorrow.
I also have a line on getting the sub-panel run out to the shop. My wife Lori works at a local convenience store, and their handyman/contractor said he would stop by this evening to take a look at the situation. I told him I can run the outlets, its the panel I'm most concerned with.

Saturday, August 9, 2008

Doors!

I visited Grizz today up in Fulton. We caught up on the family news and events, and then got down to business.
I can only describe the process, as we just went to work and didn't stop to take photos. *gasp* yes, I know, but it was just one of those working sessions where photos would have slowed us down.

We first rolled his tablesaw out into the driveway, then proceeded to rip two sheets of plywood to width to fill the 6' wide doorway. Then we measured and cut the 2x4's to length first for the sides and then the top and bottom sections. We actually used 2x6's for the bottom of the doors.

Once we had the outer sections installed, we measured and cut the diagonal braces and Grizz hand cut them to fit. Here's a sketch involved in how to install the diagonals...


We were discussing which way we were going to cut the diagonal, and I finally convinced him that we needed to go top center to bottom right for the R door.

and here are the finished products:


and a second view


Those suckers are Heavy, but I managed to unload them by myself tonight. I just backed the truck up to the stairs and tipped them right out into the shop.


Saturday, August 2, 2008

Turning my first bowl on the lathe

This past week I was out of town for work, and I visited my good friend Don Orr's shop. He was gracious enough to host me at his shop for the evening for dinner and teaching me how to turn a bowl.


We started with sharpening, he showed me his wolverine sharpening jig home-made clone, and how to shape and hone the gouges we used.


I didn't get a photo of the profiles, but one was basically an ellsworth grind, and the other was a much blunter profile, which I liked more. I also got to try a round scraper for cleanup and then sanding on the lathe. Note to self, get DC fired up before getting the spinny thing going... koff koff... Turning wasn't bad, but sanding would have been a different story. Don has a really cool DC hose holder for the lathe, I need pictures of it the next time I visit so I can build a copy of it.


Here's the end product...no, wait. I'm only kidding....a little..Don had a 8 or 9" Ash blank all set.After a couple of walk throughs for angle and such here I went...Don is an excellent teacher, and I cannot thank him enough for opening his shop to me and giving me this lesson. I had a blast, Thanks Don!


Here I am starting to rough out the blank after we got it on the lathe and spinning nicely. It was a little unbalanced, but not enough that Don's very nice Jet full sized lathe couldn't handle it. He also has a Jet Midi, but for this large of a blank it wouldn't have done the job very well.


As Little Bill Grumbine would call it (.... yep, I said little. Ask Bill about hanging out with Bill and Nettie Turpin from NC after 5 Barns and you'll understand 'Little') I was excercising my 'turning muscle.' (turning muscle = Big Belly, something which Bill and I share)


After awhile, we wound up with this:


Here's proof that I didn't turn it into a Funnel (turn right through the bottom of the bowl)


Here are a Couple of shots I took at my motel later that evening


Thanks for looking!

Tools in the shop


I had to clean up my tablesaw. It lived outside under the blue tarp and some OSB for a year and the table and wings were slightly rusted. I wound up using some mineral spirits and a green scrubbie to clean it up. A coat of paste wax later and it is back in action.

Almost Dried in


The Shop is almost closed in... I finally got up and got the top of the end walls framed up.


I'm proud of the back wall, but the front one will be what it is...


My height issue came back in full force. I decided I wanted a 'hay mow' doorway up on the top section to let some light in as well as for ventilation.


Mark loaned me his EZ Smart again, and I cut the OSB to fit the funky gambrel eaves. James was a huge help with that. I was puzzling out the angles and he came up with the solution in about a minute. No pics of the cutting, but here I am putting the first panel up.


I tried to get the upper section put in, but when I got the upper section up there I couldn't get it nailed off. I'm going to have to hire Dave & Josh again to finish that part off. Money well invested.


Saturday, July 5, 2008

Framing nearly done

James and I got down to work today, I picked up lumber last weekend, and today was the first day we had time to get to work.


First job of the day, install one of the most important tools in the shop. My 'Sharpening Station'


Next we framed up the front wall. I messed up on one board, installing it flat to the outside wall, oh well, it is just one minor goof. I can go back later when I am putting in the insulation and nail on a 2x2 to fit if I need it.


I started on what i thought was the harder wall to complete, but as it turned out I think that one went easier than the other end, where I had the 'luxury' of the loft floor to work from.
I'm still debating how I'm going to finish that gap in the middle of the front wall. I'm either going to frame in for a 2' square window, or I'm going with a clear polycarbonate product to maximize the light in the shop. I'm going to have to go price them both. If I had to choose right now, I'd opt for the polycarbonate, with panels on each end of the building. The loft floor has a gap on one side, which means If I were to use the polycarbonate on that one section of the wall, I would gain more natural light in the NW corner of the shop.


Here's the loft end of the building. See the bracing and the joist for the loft? that meant that each end of the building was entirely different. The joist was sistered onto the end truss, which meant I had to add some blocking to run a topsill of sorts above it.


James was a Huge help today, and I'm extremely happy that he helped out and proud of him. He basically did all of the cuts today, learning how to safely use the CMS for the first time. (he tells me he had used one in shop class, but I'd never seen him use one before, and he did an awesome job!)

He made the first official sawdust in the shop:


Monday, June 16, 2008

Tool thoughts and acquisitions

After a very busy week of traveling, between a trip to albany for work and a mini vacation this past weekend, no progress on the shop itself since last weekend.

Lori and I took a very belated honeymoon trip to Allentown this weekend, plus a jaunt over to Carlisle to meet up with my mother and collect some items she and my Dad had gathered for us. She brought up a new driver's seat for Lori's Protege, a new sewing machine for Lori and an Eden Pure infrared heater/furnace unit for the shop. No pics of that yet, as I'm planning on leaving it in its box until I get the shop dried in. Besides with heat in the 80's or higher, who wants to turn on a heater?

However, I did managed to spend a little money on some tools;


The booty list is as follows:

There was a Black & Decker outlet at the shops in Reading, so I picked up a Black & Decker 18V drill/driver. replacement drill for my old B&D 18v whose direction switch broke recently, in reverse. Grrr. Batteries from the old drill kit still work fine, so now I have four batteries and two chargers. These are in addition to the Ryobi 18v kit. I like the ryobi kit, but the drill always seemed a little wimpy. I'm going to designate that one as the household drill and keep the B&D in the shop.

Side note about the trip. My Mom had her college 50th reunion, and that's about half way between our house and theirs in VA, so I was all set to drive down, meet up with her and return, but Lori suggested that we make it a vacation. SO, off to Hotwire I go, and find a 3 star hotel for $56 a night. Hmmm... ok, I can deal with that. In retrospect, maybe not so much. The hotel was undergoing renovation, having switched over to Holiday Inn from formerly being a Crowne Plaza. It was right in the middle of downtown Allentown, they have a deal with a parking deck, which was a very good thing. $6 a day unlimited access to the parking deck with validation.


There was a slight cleanliness issue with the room, but we overlooked it and decided that we could deal with it for the moment. The pool was closed when we got there, though it did open up later in the weekend. several little league teams made it less than desirable to my eye, but we didn't miss it much.


We splurged on a great dinner at the Allentown Brewhouse, which was half a block away on the same street as the hotel. I tried two of their house brews, and enjoyed them both. The food was excellent, I had meatloaf with beer-laced gravy and Garlic mashed potatos. Lori had peel and eat shrimp for appetizer, and drowned clams over penne. I heartily recommend the restaurant if not the hotel.

The rest of the trip was unremarkable, and I'll get back to shop stuff. One happy note was that there is a Woodcraft store in allentown, and they were in the middle of a father's day Bag sale, 15% off anything you can fit in a moderate sized paper shopping bag.

I meant to just get a couple of turning accessories;


That's a pack of exotic pen blanks, two pen mandrels (one for me, one for Mark), some bushings (since learned that even at sale prices, I paid a bit much for those), some Cyanoacrulate (CA) glue, and some CA glue solvent.

across the aisle from the turning stuff, however, were the Kreg Jigs. I was eyeing the $39 kreg kit, plus a $25 clamp, when Lori piped up and suggested I get the $79 K3 kit, which is the core of the Kreg pocket hole jig system. Her reasoning was that once I bought the smaller kit and the clamp I was within just a few bucks of the larger kit, so why not get the K3. She didn't have to tell me twice, so in the bag it went. Budget, what budget?

I looked at a few other pen items, and long and hard at some Rules, finally settling on the Incra 6" Rule.


Sunday, June 8, 2008

Roof!


The guys came back this morning and finished up the roofing. At the point that photo was taken the rains had just left, and they still had a few more screws to install, and the ends of the purlins needed to be trimmed off.


there is the 'money shot' from the corner of the house.

Lastly here is the view of the new roof from deep in the shop.

Saturday, June 7, 2008

end of the day...


Originally I was planning on stretching my dollar a bit, using some off-cuts from the 12' roof panels to cover the 'back' side of the shop. I basically underestimated when I picked up the panels last weekend. Dave talked me into buying three new panels so he can finish it off with it looking good all the way around the building.


I'm heading off to the Blue Borg in just a few minutes (Lowes for those who aren't familiar with the woodworking community's nickname (Home depot being the BORG Big Orange Retail Giant))

Last week we used Mark's truck, today I'm going to bring a blanket to put under the sheets to protect the roof when I strap them down to the roof of my truck . I figure that with maybe a couple of 2x4x10's from the borg will get them home safely. Normally I buy all my lumber from Blandings' Hardware in downtown Bridgeport, but this time I think I may just buy a few sticks from the Borg to help with the transportation.


Here's a few shots of the shop late last night (Took the family out to dinner after the guys wrapped things up last night, so no daylight shots)


I'm SO happy about the progress made yesterday, especially this view:


That shows the view up into the loft from just inside the main doors.

Speaking of which, that is on my to do list this weekend, we have a wedding to attend today, but tomorrow I'm hoping to close in the end walls and work on building the two main doors. Which of course means I'll have to buy some hardware, like hinges, a lockset, etc...

Off to the Borg, more updates later today. (I hope)

Friday, June 6, 2008

Whole lot of roofing going on!


That is Dave up on the ladder, he and his assistant Josh are hard at work today installing the metal roofing which I honestly would have had a hard time with. They fixed the alignment problem with some of the blocking, and are moving right along with the top set of blocking. Actually, in this shot, Dave is setting the first panel of roofing in place. Loud cheering going on at chez Bulken today.


different angle, same event.


Dave and Josh making sure that critical first panel is set correctly.


There it is, the top row all installed on the side of the shop which faces the house.


and jumping ahead, here's the front side of the shop with all but 2 panels installed, starting to look like a barn to me.

They've had to work around some of my handiwork, but for the most part, say that I did a decent job for a homeowner. I told them I just took my time and did my best to make it 'right'.


There it is, the front face of the shop all roofed over. They still have to put in a few screws on the lower run of panels, but it sure looks great to me. I would be a day and a half to get to this point, and they've made it look easy and there is still plenty of daylight left.


and a little more straight on view of the face. Looking great to me.


almost forgot to add this shot:


I like the white under-side of the roof, too bad it will be covered up when I insulate later this year.

Saturday, May 31, 2008

progress...some of it even forward!

The snow has long melted, and the budget was increased again, thanks to uncle Sam giving me back my money, or some of it anyway. Can you say 'flat tax'? But I digress.


After a long dark winter... (well, it wasn't that dark, but it sure was wet!) Things are moving again on the shop project.


I have been trying in vain to contact a local roofer about installing a roof on the shop for me. It turns out he is less than reliable, so I decided to do a gut-check and try to install a Metal roof myself. I originally was going to put on a shingle roof over sheathing, but the plywood installation got to me.


I left the building 'open' over the winter, which means there is some water damage to the CDX flooring, but that's easily remedied with another layer of flooring. I will add that if things get too annoying walking around later this summer. Job 1 is to get the metal roof installed.


ANyway, I went to Lowes in Oneida to check on availability, figuring if they didn't have the color/size I needed I could then schlep over to Cicero or even Rome if I had to. HOwever, Oneida was well stocked and it was two stop shopping (one for pricing, two for pickup after gathering up Mark to help with transport and cutting of the materiel).


They sell metal roofing in 8' ($30)or 12'($45) sections. Hmmm... I've got 22' of run to cover, so I mistakenly calculate that I'll be able to do this with either 28 8' sections trimmed down to 5' with 3' scrap left over, or 14 12' sections (which, as it turns out works, but more on that in a moment), cut up into two 5' sections and 2' scrap left over apiece. the 8' sections would have run me $840 plus tax, the 12' sections ran me $630 plus tax and other assorted accessories. By the time i got out of there it was $930 later. (Screws for securing the sheets, ridge cap, a saw blade to cut the metal, etc...)


Now, I've got a 6.5' bed on my pickup, as does mark in his, and we've got 12' long pieces to transport. Hmmm. Mark rigged this setup in his truck and driving carefully on the back roads we managed to get things home safely.


I wound up with the ridge cap and some tools in my truck:


Mark graciously offered the use of his new toyl, the Ez-smart cutting guide and associated circular saw. Man that's a slick system, but I've got other toyls to buy first. Wemeasured and cut all of the 12' sections as I mentioned before. Here's Mark with his EZ system in action.


The roofing is 29 guage painted steel, and we decided that using a high tooth count 'disposable' blade would do the trick. I'm pleased to report that a Skilsaw 60 tooth (well, now it is 59 tooth) carbide tipped blade worked very well. Here are all of the panels ready to use:


(no pic, but you'll have to trust me, it did happen)


So, we tore it all off. The metal roofing is normally laid down over 2x4 blocking spaced about 2 to 3' apart. Mark, James and I spent all day sunday and half of monday putting this up and in place:


and the front side...


Lori and the boys were pressed into service as well, and with all of us working, we managed to get the loft floor installed:


On a humorous note, It seems I had a guest earlier this spring...

I'm going to carefully remove that from where it sits now, and put it on a shelf in the shop.


Wednesday, February 13, 2008

mid winter bleahs

Well,

it definitely has been awhile, but thngs slowed down after the end of july. I did managed to get part of the roof on, and all of the trusses up, by the end of October. Then I discovered (re-discovered actually) that I have a very well developed fear of heights when at the top of a ladder. I'm fine in a building, but when there's a long drop and nothing but a ladder to hold onto, I tend to really want to hold on for dear life.


I'm hoping to get a crew to do the rest of the sheathing and finishing up the end walls (I Might be able to swing those, but if I'm paying for sky work, I might as well go whole hawg)


On the plus side, work is going very well. I'm currently lead hunting, which means I'm looking for 'For Sale', 'For Lease' For Rent, or 'Available signs and the properties attached to them. This includes land, which is a good thing, cause I've been hitting some really rural territory and updating lots of vacant land listings.


I think I'll be starting another blog for some shots which I'd like to share, I'll update here when I get a couple of posts done, as well as a catchy title.


here's an artistic interpretation of a shot as an example. Just a valley I stopped and saw tonight on my way home, put through photoshop and a filter.

Thursday, November 1, 2007

Catching up with the truss building

My mom pointed out that I skipped over some important stuff, so bear with me as I describe building the trusses for the shop.

The plans I worked from (I'm to the point now in June of '08 that I'm mostly done with the plans, now comes the wiring and finish details) described building the trusses yourself vs. having them farmed out. I simply had to cut 8 2x4's to length and angle, then using a jig laid out on the floor of the shop, assemble the trusses, with gussets and construction adhesive.


Mark cut these pieces on the right to size using his Radial Arm saw, which really helped with the accuracy of the trusses.


Here I am cutting the larger gussets to size. They were used to attatch the two halves together


I used my tablesaw crosscut sled to gang cut a notch in some of the upper truss pieces for the end trusses for the perlins to fit into. In the end, however that proved unnescesary because of the metal roof I wound up using. The blocking for the metal roof did a great job of tying the all of the trusses together.

After cutting all of the pieces, (and re-cutting some when we had to rebuild a couple of the trusses) a pattern was laid out on the floor of the shop, and the pieces were nailed and secured with construction adhesive.


Here is Mark using the semi-famous Polish Polearm to muscle the first two trusses up on the end of the shop. We did those two the hard way as it turns out, putting them up together including the perlins, which realllly made it a) heavy and b) unwieldy.


the rest of the trusses were installed individually. Grizz helped on that job, and without the two of them plus Lori and the boys my shop would still be in the dream stage.


Jumping forward a bit, here's how things looked once we had a few more trusses installed.


Afer that, it was 'time' to install sheathing for the roof. I made this neat jig to help get the sheathing up on the shop. In the end, we wound up removing the sheathing to put the blocking up on the roof, but here was how the sheathing went up.

The sheathing went up on those two boards screwed to the joists, there were plywood stops which would catch the sheet allowing me to climb the ladder without having to carry the 5/8 ply sheathing.

Saturday, July 28, 2007

Walls are up and sheathed!


Boy have I got a lot to chat about.

when last we met, our intrepid hero had just finished framing half of the front wall of the shop...

The rear wall was originally framed as one unit, but since 20' lumber is hard to come by, I had to effectively put it up as two sub units. (funny thing when a nail tears out the board goes 'skriiitch' which I can attest is NOT a pleasant sound at all)

SO, on the front wall, I decided that two halves were better than one long wall which would no doubt go skriiitch again.

Adam and James helped with the lifting and so forth on this wall pretty cool huh? As you can see there will be a door and window on the front expanse, the big double doors will be for tools and large projects, and occasionally for ventilation and/or cleaning of the shop.


After getting that wall up, I cut and installed the top plate, which tied the whole shebang together. (or started to)

We borrowed a ladder from the fire house (thanks Lori!) and it sure did come in handy. I've since been loaned two 'little giant' ladders (one real and one clone) which are those talented flip/fold extension ladders. I Know the budget won't hold a real Little Giant, but the Gorilla ladder which is a clone of the little giant sure seems to work just as well, so I'm saving up for a 21' Gorilla sometime next month.


There is the view from the far wall looking back at the main door. It has been almost three weeks since things looked like that, what a nice view though, no?

By the end of the day, my left knee was complaining about the ladder work, so I pressed James into service finishing off nailing the top sill in place.


At this point, all three boys have helped build the shop, and actually today, Lori got involved as well, but that's for later in this post.


That just about wrapped up the weekend, and some time the next week, Grizz and I got this done:
That's 5/8 osb sheeting. We manhandled that into place after screwing a level board into place to hold the sheets until we got them nailed off.
Thanks Grizz!
That spindly little ladder sure wasn't cutting it, so that's why My friend Mark loaned me his Gorilla and I asked Stu for his Little Giant.

Rain and a busy wrap up on my month at work ( for bonus purposes) meant that I didn't get a lot done until last weekend. I even took half a day and helped Grizz out with re-rocking his kitchen. It seems his wife and daughter did some of the demo on it while he was out working last week. He called me Saturday morning, and by the time I left Saturday evening we had it looking like this:

ready to mud and then paint. I wonder how it turned out this week. Hmmmm


Before I scooted up to Fulton for Rock duty, I pressed James and Adam into duty for the long wall OSB. In about three hours we managed to get the last wall up, mostly without mishap, and Just as I ran out of nails for the nail gun.
Mark and I had finished the front wall the night before, and it looked something like this in the morning:
there was one sheet which needed a slight trim to fit, and we ran out of daylight before finishing that up. The boys and I eventually got the last wall up, which went very smoothly thanks to the two of them. I can't say how much I appreciate everyone's help on this project, Thanks guys!


here's the inside view by the mid morning light. Starting to look like a building now!


The boys and I took things from there: we first nailed up the 'strippers' as one framer wrote to me, once the short strips were installed the two boys would hold up the panel and I'd nail it off with the nail gun.

Occasionally I would hold the panel while they moved the ladder and the nail gun:

there's Mark's really snazzy ladder. Thanks again Mark, it sure has come in handy!

This is how things looked through the doorway by the end of the morning: I left the end wall panels 'wild' and cut them off last night after work.


Man that sure does look nice! Still a long way to go, but I'm one major step closer to having the shop up.
Patrick had to inspect things too, I hate to say it, but I lost my temper at one point, and there is a hole to patch in the back wall. He wanted to see it, as his brothers though it was hilarious.


Sunday, Lori and I took the boys to the Syracuse Nationals car show. We had a ball, and I have loads of photos. There were about 10 '69 chevelles at the show. This rag-top was just gorgeous, having recently had a frame off restoration.


This combination is a local shop's pride and joy. Gotta love that pairing.


As I said, this past week had me very busy at work, and when I came home I just plopped down and didn't want to work on the shop much. Also, hanging tyvek is a two person job, and it was a lot easier with Lori's help today:

I think I need to buy one more roll of Tyvek, which will have to wait just a bit, as new eyeglasses ate into the budget yesterday. (Middle age, gotta love it! can you say Bifocals? Thanks to Brother Ben Franklin I will be able to see up closer better than I do now)

Lori and I snapped chalk lines last night, before dusk put an end to the evening.
Here it is after two laps around the building, which all in all went rather quickly. I did smash a couple of finger tips installing the plastic gasket-ed nails. And promptly was reminded of Garner's law. Anything you injure will get hit at least three more times before it heals. Bill was a professional roofer for a LONG time, so I will bow to his wisdom and experience in this matter.

OW!


as you can see, dusk was approaching, so we put the ladders away and finished things up for the evening. The three tiers of tyvek are nailed off at the recommended spacing, and the seams are all taped off with house wrap tape from Lowes. Specialty product which I hope has some super formulation of glue, just seemed like blue and white packing tape to me, but what do I know?

Tuesday, July 10, 2007

Well, the best laid plans... I hoped to put the final wall up on Wednesday, the 4th of July. Well, rain foiled that idea. If Lori and I hadn't snuggled back down for a nice rest in the morning I suppose I could have managed to get the wall laid out, if not lifted into place.


As it was, I did this on Thursday evening instead:

I had nice sunshine to do some more work on the last wall. It was just Patrick and me, so I knew I wasn't going to get it all the way done, but we got a lot accomplished.


I cut the studs, and laid out the wall in two sections. One 8' long and the other cut to fit the remaining space. 11' and change (had to allow for the end walls yaknow)


laid out the window and doorway, nailed up the headers for each of them. Both will top off at 80"
I ran out of daylight before I could finish the complicated half, though.

Patrick helped me by holding the far end of the small wall section, while I nailed it off with the air nailer. He was startled a bit by the noise, but liked the results. At his encouragement I went ahead and lifted the 8' section into place and tacked it into place:
We ran out of daylight, but that was a pretty good start on the last wall.


At this point, I decided to stop for the night. (Not that I had a whole lot of choice in the matter).

Here is the wood pile,I've used up all of the 2x4x10' boards, and what is left are the 2x4x12's, 2x6x12's and 2x8x12's (which are the joists for the loft) Other than the last joist, I've done pretty well on the pre-order for lumber. I think I'm going to need a few more 2x4x12's, above and beyond what I have stashed down in the storage unit, plus what is on the skid there.

Friday evening came and went with zero progress, I was just wiped out after work this past week, despite the day off in mid-week.


Saturday, both James and Adam pitched in and helped me finish up the last wall:


at this stage it is just tacked in, no top sill in place yet. HOwever it is UP!
Both boys were a HUGE help this past weekend, and I'm quite proud of them.

I did most of the high ladder work, while James did the cutting and ground work. calls of 'Nailer' and 'goop' (for the construction adhesive). I kept him scurrying around, while I did my stair stepper exercises.


Adam L. meanwhile, is the expert at toe nailing the walls into the deck.


James tried his hand at photographer, while I was putting away the tools. I really was as tired as I look there. (ok, maybe I don't look tired, but I sure was!)


We ran out of nail strips for the air nailer on the last top sill board. I put James to work at that point nailing in more sinkers to secure the top sill.

His nickname at this point is 'Mater'. That's like Tuhmater, without the 'Tuh'!


Again, I'm SO proud of my boys for pitching in. all three of them!

the heat index has kept me inside this week, it is supposed to cool off tomorrow, so I hope to get home and get some trusses nailed together. If it is raining, I might schlep over to Newport and borrow a ladder from Stu. ALthough judging from the email I got this evening, I think I may put that off awhile. Hope you feel better soon, Stu!

Monday, July 2, 2007

Weekend Progress


Welcome back!

After a week of little or no work on the shop. it was a busy weekend with a Lot of progress. Adam was a huge help to me this weekend, before an allergic reaction to pressure treated (we think) sawdust sidelined him. Thanks again buddy!

Even after I sent him to the showers he came out and helped me when two people were required. (lifting walls up)

Saturday, he and I used a simple floor jack to lift the deck remove each pier and shovel more stone under each one to better support the shop. After leveling the pier, Adam wound up nailing in the back of the joist connectors, I did the heavy lifting of the piers as he shoveled stone. We did them a few at a time, but finally wound up with the deck as level as it is going to be to start off. It is built on grade, and will be subject to shifting and frost heaves in winter.
It looked for awhile like we'd be rained out early Sunday morning. by 10:00 or so the weather cleared up and we started in again. I started with the far wall, opposite the main doorway. I decided to use the larger of my two windows I was given last month on this wall. It is literally the first framing I've ever done. I hope it holds up (ha ha ha).

You may notice that there is no sill plate on that wall. Last weekend when my buddy Grizz and I started working on the trusses we nailed down the sill plate. Not just a couple of nails, a LOT of nails. I was not going to pull it up. Instead we just built the wall without the sill and then toe-nailed the wall in. after raising it up. I screwed a couple of scraps of plywood across the bottom of the boards to keep them relatively stable while I raised the wall.


There it is. The first wall!

the caption for this is:

"Hurry up and get a photo of this!"

note, no bracing is nailed off yet.

The window sill there is 42" from the floor, the window is 66". yep, that's one tall wall!

That window will get me the afternoon/evening light in the shop.

all braced up, much better than me holding it up for the duration. (wouldn't get much done that way would ?) That wall took us about an hour and a half to do. Not that the time was important, just a note.


About this time was when Adam discovered his dermatitis, so I sent him off to the showers, and he only helped occasionally from here on out, basically when he was absolutely needed. (pretty much helping when lifting the walls into place, primarily)

I cut and laid out the 17 studs for the long wall. It is the simplest of the four walls, no windows or doors, just 20' of structure. This wall too had part of the sill already nailed down. It was fun getting this one lifted into place. Wound up putting it up in two pieces, with a frantic repair of the top sill which came apart when we tried to lift it.

Long ago on a family canoe trip, there was a Lew and Phil creation known as the Unstable table. I've discovered its progeny, the Unstable Ladder. the only stepladder we have is one which really needs to become artwork on a wall somewhere, as it is just about beyond its useful life. Adam braced the ladder and I went up as far as I dared, and attempted to nail the two sections back together. I'll get it secured later on when I put the 2nd top sill layer on. for now, I'm leaving a plywood brace screwed in to help hold things together.


There's the long wall. with the ladder of ill repute.


Halfway there!


Now for the main doorway wall. The walls are 10' tall, and the plans call for a 6' wide double door for the entrance of the barn. I'm adding a 'man door' on the long wall facing the house, so this doorway is mostly going to be for tools and projects to enter and leave the shop. I decided to keep the doorway in scale with the building height wise. I bumped the doors up to a full 8' tall, keeping them 6' wide.


That is about where we wound up. I was pretty sore by this time, and I've decided that cleanup needs to happen before darkness falls from here on out.

Now for a few fun photos.

I have an official shop cat now. Miss kitty supervised all weekend, investigating frequently, and making sure the materials measured up.


Looks like the neighbor's crab apple tree is going to get an overdue trim in the next couple of weeks,hmmm? there is still a floor and truss system to go on top of that 10' sill plate. Actually it is more like 12' at this point, thanks to the piers, plus the 2x8 rim joists etc.

there's a view of what lumber I have left. I'm running out of 2x4x10's, but that's just fine, I know I bought a few too many 2x4x12's, and if I do run out of anything there are a few extra pieces in the storage unit just in case. the pile on the left is the stack of 2x8x12 for the loft joists.

And lastly for tonight (er, this morning, looking at the time... eep)
there is the view looking back towards the main door from the far corner of the shop.


In the background you can see my chopsaw stand, with the cutoffs strewn across the lawn. I'm happy to say that they're mostly 8" or less in length. There were a couple of longer ones, but I've saved those, knowing full well that there will be plenty of opportunity to use them up somewhere!

Thanks for looking!

Thanks again Adam!

Saturday, June 30, 2007

Little bit of progress:

Didn't make a whole Lot of progress today, before the rains came, so here are three 'virtual' shots of the shop. First looking across from the main double doors toward the windows.


The tables and cabinets represent my benches and tools. (yeah I could sketch-up it, but i know my old software and why spool up on sketch up when I could be building the shop?)


the window on the left is a 32x44" vinyl clad, and the far window is 32x66" a replacement 'drop in' which I'm putting on its own wall. with 10' walls to the sill, I have the luxury of keeping the window above the bench and still have a decent view.

here is a shot from the 'far' corner of the shop looking across to the three doors:


funky, huh? the blue section in that image shows where the loft ends, and that far half of the shop will be open to the trusses above.


oh, and for those who prefer a real life view:


and the matching view from the cad program.


if the rains end by morning, the boys and I are going to either attempt to build the trusses again, or put up some walls, either way we'll make some progress!

Sunday, June 24, 2007

Non-shop update

Saturday's Masonic event went very well. I was a videographer, who helped transmit the Grand Master's investiture of his grand line officers on the Masonic Care Community's cable system. Seating in the chapel is limited, so we pipe it over to the admin building for 'overflow' seating. My best friend Stu is the head of the technology committee (who are we kidding he IS the technology committee most of the time), and when he put out the call, I was more than happy to help out.

Today was graduation day for James' girlfriend Gabrielle:
(note to self, tomorrow when you have a moment, insert photo here)
I've got tons more images, but that's the only one that doesn't need Major editing to look decent.

I did do Something shop related today, I zipped over to the blue borg (Lowes)and picked up some hardware and a couple more carpenters pencils.

thanks for checking in, more later, I'm off to bed.

Friday, June 22, 2007

Best laid plans....

Well folks,
tonight was an exercise in frustration. Grizz stopped down. We surveyed the flooring, decided that a little adjustment was in order and fixed the one corner before moving on to truss assembly. We started laying out the parts for putting trusses together. Last year before closing up shop with John, I pre-cut enough truss parts for 9 trusses, which is what the 16' long barn requires. My barn, however is 20' long, so I'm going to have to fab up a few more parts. That was where we Started. We ponka'd (installed with framing nailer) two boards down which will eventually wind up as the sill for the walls. Then we measured out 29 3/4 on one wall , and 52 1/4" on the other wall. Setting those marks allows us to use the wall parts as bracing to build the trusses. Or try to.

We laid out the 4 short rafters, two with birds mouths and two without, each cut to the appropriate angle. We then took a 10' 2x4 and traced the cut line to make the long chord of each truss half. That's when things started going 'wrong'. No Injuries (this time, the Vorpal Staplegun (Vorpal is a Dungeons and Dragons term for really nasty) stayed away, so we were safe, only using the framing nailer and circular saw. the long chord of the truss assembly runs from the ridge joint to the birds mouth on each half of each truss. My plans show a board which gets sandwiched between three gussets, connecting the shorter legs, forming a triangle. Two relatively 'flat' triangles combined with the floor of the loft work together to hold up the roof, while still allowing access to the loft.

I traced the line across the board we tried to use, and Grizz made the cuts. If things had gone right, we should have had at least three or four trusses completed by sundown. IF.

it turns out that when I cut the gusset parts, I mis-measured, so I have 22 incorrect gusset parts. guess I break out ye olde checkbook and get another couple of sheets of 7/16 plywood. I could use some in the pile here, but they're earmarked for the roof itself.

I got a wonderful email from my cousin Emily. It seems that I'm Not just writing this to myself, I actually have an audience. (hooray!) (I was beginning to wonder) Thanks for checking in Emily! I sure do hope Lew is watching. Knowing him, tonight he is laughing at the keystone Cops routine.

I have been tapped to help out at the Masonic Care Community in Utica tomorrow for the incoming state wide officers. That will pretty well negate any chance I have of getting any decent sawdust created. ah well, I can always get out the floor jack and level the piers, IF I get home in time to do anything. Sunday afternoon is shot as well, so I've resigned myself to the shop being delayed a week. Not that I'm on a timetable, but I really want to get it dried in 'soon' so I can start moving tools up to the shop from the storage unit.

I think I'm going to try and get at least four sheets of ply and move them plus my table saw up to the house Sunday. I'll have to put the saw Back down in the storage unit Sunday evening, but at least I'll be able to cut the truss parts before heading off to Gabrielle's Graduation party.

speaking of fabrication work and trusses. The plans call for rafters/trusses 24" on center. I'm seriously considering making 5 more trusses total, and putting them 16" on center. That will help compensate for any higher snow load. Last winter we got hammered by a few northeasters, and in some spots we had 10' of snow AFTER it settled a bit.


Sorry there weren't any pictures tonight, just too ticked off to take any. Not much to show, since we mostly just moved wood from one pile to another while scratching our heads a lot.

More tomorrow, after I get home from the Masonic event.

Wednesday, June 20, 2007

Major update time

Well folks
I've been remiss in my blogging, but for a good cause.
Saturday went pretty well, all told. I got most of that 'punch list' done. Grizz and I bought hardware, I got the propane refilled and bought more landscape cloth, which I late returned.
Photo Sharing and Video Hosting at Photobucket
Left to right, that is Grizz, Sean and yours truly. The three of us were scratching our heads looking at the site and discussing the options to level it off when Don the rock guy called. An hour later, we had this backing in through the side yard (borrowing the neighbor's lawn)

Photo Sharing and Video Hosting at Photobucket
approximately 5 yards of gravel dumped roughly in the center of the shop site.


the LOML was shocked to see the pictures of the stone delivery. I guess she didn't expect an 8 wheeler like that in our back yard.

This was a multi-wood forum project, with Grizz from the WWA and Family Woodworking and my friend Sean from over on Woodnet helping out in a Huge way. Both guys brought tools and while we didn't use them all, the framing nailer was a great help, once we got better nails. 3.5's would jam occasionally but 3.25's worked just fine.
Sean took over the site prep and with my help we went from lumpy/wavy ground to 'screeded' stone, level in both directions. While we were doing that, Griz's circular saw reciprocating saw and sawhorses came in very handy, cutting those extra truss parts and joists.

Photo Sharing and Video Hosting at Photobucket

That's Sean, aka the Rockmeister/framer/all around great guy. After smoothing out the stone, We ponka'd the rim joist into shape, and got creative when it came to squaring up the frame. I don't have a maul or sledge hammer, so I suggested that Sean use one of the concrete piers, three hits and it was square.
By the end of the day, this is where we wound up:
Photo Sharing and Video Hosting at Photobucket

Somewhere in the middle of hanging the joists, I realized that I miscalculated the number of joists required. We wound up 1 joist short, which I didn't realize until Sunday after my lumber guy had delivered 10 2x8x12's which I had forgotten to order, but will need sometime next week.

That took a trip to Lowes and some adjustment to the materials list. they were Out of 2x8x12 PT, so I got a 2x10x12 with correct hanger instead. makes the entrance to the shop just a tad stronger than the rest of the floor, darn.


I briefly toyed with the idea of leaving the frame directly on the stone, but 'slept on it' and decided to put the piers back into action after all. Sunday went very smoothly, thanks to James and Adam, my two stepsons. With their help (thanks guys!), we got to this point:
Photo Sharing and Video Hosting at Photobucket

Another new friend Mark from over on WOodnet came by as well, and despite him stapling his own hand with Lori's newfangled staple gun, we got a lot accomplished by dusk. Not 5 minutes after Mark stapled his hand, Lori did the same to her own! Ouch. both are recovering nicely, thanks for asking

Sean was back on Monday night, and we got more insulation installed and a few sheets of plywood installed as well when the insulation ran out.

Photo Sharing and Video Hosting at Photobucket

Tuesday evening, I picked up two more rolls of insulation and then installed them. Rain was fast approaching, so I called it quits with the deck looking like this:

Photo Sharing and Video Hosting at Photobucket

Tonight, I'm not out there at all, I'm very tired tonight, so I'm going to avoid power tools and get some shuteye. Thanks for looking!

Friday, June 15, 2007

Twas the night before shopbuilding...

Well, there are now 4 large pallets with various stages and types of lumber products sitting on them. Unfortunately, life got dramatic this evening, and I was unable to go pick up those niggling little last minute things... like nails, construction adhesive, Ice, soda, things like that. SO... guess who is getting up at 4 with the DW and running to walmart, then the hardware stores. One in hopes of getting the hurricane ties, or similar, and the other for several items I know we'll need, but working 10+ hours every day this week didn't allow me to pick up.

On the plus side, I got a bunch of photos and properties done this week, I know another section of Sillycuse like the back of my hand, and I'm on to other areas on Monday.

I'm on my office laptop, and I didn't bring in the mouse for it, so I won't have any photos tonight. Suffice to say the bill for the lumber was a nice one, but If I did my calculations correctly, there should be a minimum of my usual three plus trips to the hardware store for any given project. I've 'suspended' that rule for the duration of the shop buildup. If I need something I go get it, period. Hopefully other than the fasteners, I should be pretty well set for the weekend.

The shopping list for the lumber for the shop expanded to include enough 2by4 and 2x6 to deforest a small stand of trees. Not really, but this is the 'biggest' thing I've ever built, so bear with me.

I was going to put stone down and then the piers, but unless the stone guy calls tomorrow morning, I don't think I'll get stone down before the piers. If I don't, I'm not too worried about it. I am using the piers to keep the pressure treated wood out of the potential water zone. We occasionally get 'lake Bulken' out back of the house, and the shop is in the path, but that only lasts a few days or a week at the longest.

The stone was/is to help with drainage and keep the grass under control. I'm still going to put down landscape cloth under the piers, and eventually I'll shovel stone under the shop from the edges as needed. One of the things I'll be buying tomorrow is some roundup weed killer, We'll spray that down just before we put the cloth down, and hopefully take care of the grass under the shop that way.

The budget just didn't allow for any major terraforming, with machinery, so instead we're going to jack the deck up, level the rim joists and then put the piers in. The rim joist will be secured to the piers by gravity and shims, as well as 4x4's and connectors. I figure that however many thousand pounds all that wood, plus the contents of the shop tools etc... should keep the piers from going anywhere. As for the fact that the piers may sink into the lawn. so be it. I can always jack up the shop and reset them like the camps I visit down in Pocono. If that happens to often, We can jack it up one last time and pour concrete pads for the piers. This summer into fall at least I don't expect there to be much trouble. Winter into spring will be the issue.

to do list for the morning is as follows:
  • get Lori up for work
  • grab another hour or two of sleep
  • stop by the storage unit, unearth table saw from pile of stuff, get it ready to move to the house.
  • meet grizzz at hiawatha fasteners, buy nails, screws, joist hangers and hurricane ties or equivalent.
  • stop back at the storage unit, partially disassemble tablesaw, to get it back to the house.
  • stop at blandings, get propane tank refilled, buy a few more tools, more landscape cloth, construction adhesive
  • brew coffee
  • find, set up fly for tablesaw in case of rain.
  • set up mitersaw station

that should be enough to be dangerous.

lots more pics etc. once the day is over. Thanks for looking. I suppose i'm writing this for my own gratification, as noone has left comments or let me know they even read this. (hint hint, comment away if you're reading along at home folks)

g'night it is just after midnight, and the alarm will be screaming all too soon.

Tuesday, June 5, 2007

Progress, some of it even forwards!

Howdy folks,
I took ten minutes this afternooon and called the building inspector's office about renewing my building permit. They have a couple of questions which I predict I'll be able to clear easily next week on Monday. Basically they wonder who exactly is building the trusses (I will be) and who Dano is.

This is a new inspector, different than the one I explained things to two years ago, so I expected something like this. I just need to show them what I'm doing and I should be good to go. I also need to show them where I will be putting the shop on the property. (I seem to recall doing this before but they prior inspector didn't seem to interested in that).

The good news of the day is that with the setbacks, I only need to be 5' from the property line (I thought it was 6') as well as only 5' from the existing shed. That means that I won't need to move the shed after all, which is a very good thing indeed. I need to be 10' from the house, and 5' from the property line. I'm going to double check clearances, but I believe that I'm 11' from the house as I laid out the 'closer' site on the diagonal, and 6' from the existing shed. It will 'just' fit. It it won't fit there, Worst comes to worst, we'll just drag the shed over and make room.

I just discovered Tom Smith's blog about his shop. K and T Woodworking Blog

I'll have to do some catching up with Tom's blog, if the rest is like his 'top' page, It ought to be a good read, eh? (he's from Alberta). I wonder if he Curls.

Two days down at work this week, and I'm just a bit frustrated, the rain has just put me way behind my goal of 30 properties cataloged per day. I hope to get ahead more tomorrow. I've put in 11 hours each of the past two days, I think I'm going to pull a 10 hour day tomorrow and then just an 8 on Thursday, starting early has been nice, so that is one thing I'm going to continue to do. Funny thing, I was never one to be an early riser, but I'm enjoying the 'morning' light when I'm photographing.

Enough about work.

Sunday, June 3, 2007

Big deliveries this weekend!


Well folks,
My checkbook is now lighter. I stopped down to my favorite lumber/hardware dealer in Bridgeport and about three hours later had these dropped off.

My plans are from Barnplans.com
and while Dano designed these plans to work with 4x6 PT and to sit on grade, after consulting with the lumber yard, I decided that a little upgrade was in order because of the weight of my woodworking tools. SO, what you see there are 24 2x8x12's (and 4 2x8x8's which aren't visible in this shot) and 8 sheets of 3/4 CDX plywood. which will rest on these:
The 2x8's will be doubled up around the rim and then I'm going to use joist hangers for the inside joists, plus blocking between the joists every 4'

The piers will go over crushed stone, though honestly I think the piers will be enough to allow drainage beneath the shop (they're 10" tall) If we get more water than that, I've got bigger problems to deal with.


the two young men who delivered the lumber were amazingly quick at unloading. I managed to 'help' them on just a couple of the 8' joists, but then I just got out of the way. They were pulling 3 of the 2x8x12's off of their flatbed at a time. Now I'm no lightweight when it comest to moving stuff, but those kids were amazing.

closer view of the PT. That stuff is good and 'wet' still, and Heavy! The 8' boards are on the 'back' side from this vantage point, still on that pallet. Funny thing about those pallets, they were used to ship 'rollers' to my former job in Rome. I brought home 5 of those last year intending to salvage them for something. I think they're doing a fine job keeping the supplies out of the grass just as they are! I'll probably break one of them down this coming week to make some saw ponies (short sawhorses) for the project. That wood in the pallets is weathered after sitting outside in the elements all winter, and just good for 'utility' projects now. Not that weathered and 'utility' projects don't have their place.

There is a close up of the CDX. As the budget allows, I would like to put down a better wood floor someday. For now, though that will more than suffice.

Blandings Hardware is a prime example of a vanishing breed, the small town shop where the owners are supportive and service is superb. The big box stores have their place, and for some things I'll stop in and pick them up. Lumber however is not one of them when I have such high quality service and excellent products available for a comparable price from Blandings. With perhaps one exception, everyone who works there knows me by name, how many staffers at the "Borg" (Big Orange Retail Giant) know their clients that well?

Not that staffers at the Borg are not nice folks too, but I'd rather keep my local yard in business. In about a week the rest of the lumber and sheet goods will be delivered (it will take me about that long before I will be ready for them.
Thanks for checking in!

Friday, June 1, 2007

Shopping trip and thoughts on Shop Power

Welcome back,
I had a busy 4 days at the 'office' this week, and while it wasn't quite the 'last thing I want to do is type on a danged computer', it was close. A lot has happened in this 4 day week, and yet Nothing has happened this week.

A big thank you to everyone who has chimed in on my shop project with all the kind words and support! Unfortunately, the yard looks pretty much as it did the other day. I still haven't got my permit renewed, and it looks like I won't for at least another week yet. I'm going to go ahead and have some lumber delivered tomorrow just the same. I am going to stage the PT near the eventual shop site on top of those pallets. The 6 sheets of plywood will go in the shed, which I'm going to have to dun out tomorrow if it doesn't rain. (if it rains, only the PT comes home)


As you can see, I made a fastener run to the local Hiawatha Fasteners. I picked up two sizes of drywall screws, plus two sizes of pan heads for use with the Kreg Jig, and then some silver coated 2" deck screws. Honestly, only the deck screws are for the shop itself, the rest just kind of jumped in the basket. $35 invested in the shop. I would have picked up some nails, but I wasn't sure yet which size to buy. Since I"m working in Sillycuse the next few weeks, I could drop some serious cash there, considering it is 'on the way' . I'll need to see what kind of nailer I can rent/beg/borrow before I buy too many nails, though. The deck screws are going to secure the flooring to the joists, every 6" to 8". I think for that job I'm going to 'hire' my middle stepson, as well as pick up a new tailed drill if I can find one I like on sale.

Jimmy (Wooder) on the WWA asked about power, which caused me a bit of concern. I knew I would need power, but hadn't figured out the particulars. A flurry of posts on FWW entitled "Electrical Question" resulted in my feeling Much better about supplying power to the shop. To sum up, with my likely tools, I'm going to be 'ok' at least initially with pulling 60 Amps out to the shop, the house's load is such that I can pull the shop power and not have to upgrade the house power (yet). The line drop over the distance from the main box to the shop is a concern. Marty of The 'Birth of a Shop' mega thread fame, expressed concern about the health of my tools if I choose to 'rough it' (live off of extension cord) until I can afford to truly pull power out to the shop.
Marty, you'll be glad to know that I'm rethinking the location of the shop. I chose the 'far' corner of the yard for the sake of it being comparatively drier than this spot.


pardon the unique items I chose to block out the rough site of the shop, but dark was fast approaching and I just grabbed whatever was handy. That spot just meets setback requirements from the far property line, the House and the existing brown shed. I'm going to have to check with the Codes inspector if that site will work or not, but IIRC it should work well. I'm 11 ft from the house, which in my mind is the most important clearance. It is 6' measured diagonally from the corner of the brown shed as well as.

I'm seriously considering moving the existing shed, as it is only resting on several concrete blocks. I'm thinking that jacking it up and sliding a couple of runners under it and dragging it about 10' or so to the north, which would then let me get the same 10' from 'everything' clearance from the house and the lines. I'm also considering joining the two structures with a 'breezeway for more storage. if I built a 4' wide by 10' deep connection, I could use that for my compressor and DC storage. I just need to figure out if I can do that and still please the Code. The more I think of that the more I like it. I hope I can pull that off. It would avoid the problem of a lean-to which would eat up more yard space. Honestly, that 6' clearance would be a waste 99% of the time. I'll still need to move the existing shed a few feet no matter what, unless I put the shop toward the center of the yard, which I'd prefer not to do, but it may come down to that. If I put the shop there, I'll definitely have to have a load of stone brought in, In the other end of the yard I could get away with just bricks, but that corner of the yard is the 'wet' one, and more drastic measures are needed.

Luckily It looks like affording 'more' shop is going to be easier. My new job just took an interesting turn, one which has a double edge to it. On one hand, I am now authorized more hours for OT including weekends if I want to work them, but certainly 'overtime' during the week. Lori and I will have to work out what days will work best for doing that, but I'll be putting in lots of time no matter what for the foreseeable future. The downside of course is that I won't have as much time to devote to the shop if I'm in the field working. I've set a goal, however, which should net a nice tidy sum by the middle of July, and again in August with my company's bonus program. Basically the more building records I produce, the better I get paid. I'm going to be 'making hay' while the sun is shining, or until the Overtime Budget shuts down. (basically all summer). Luckily I'm more inclined to pull 10 or 12 hour days for a good cause, and a better shop and fatter bank account qualifies. If I need a day off every now and then I'll take one, but I'm going to 'stay out' until I hit my goal every day. Lately I've been staying until I get 20 per day. My new goal this next week is 25 to 30 properties per day if I can swing it.

See y'all tomorrow, with more pics!

Thanks for looking!